Flat Rate Standard Shipping to Canada and USA. Order before 2 pm MST for same-day shipping. Call us: +1 403-455-0358 Flat Rate Standard Shipping to Canada and USA. Order before 2 pm MST for same-day shipping. Call us: +1 403-455-0358

Blogs

HEAT TRANSFER VINYL ON A HAT

HEAT TRANSFER VINYL ON A HAT

APPLYING HEAT TRANSFER VINYL ON A HAT: COME AND LEARN WITH US!

Hats are popular to wear because they may add color and elegance to our outfits. In today's article, we will tackle how to apply Heat Transfer Vinyl on a hat using a household iron. It may not be easy to iron HTV onto hats, but with this guide, you'll be able to do it. Let's get started and learn the step-by-step on ironing Heat Transfer Vinyl on hats!


Before proceeding to the steps, the materials needed are listed below.


MATERIALS:

- Your chosen Heat Transfer Vinyl

- Household Iron

- Teflon sheet

- Cutting Machine

- Weeding tool

- Towel or any thick fabric

- Heat tape

- Measuring tape


Let's now proceed to the step-by-step procedure and enjoy working with it!


STEP 1: CHOOSING AND SETTING UP YOUR DESIGN.

First, we will choose the design and set the proper place for it. Once the desired design is selected, upload it into your Design Space. Grab a measuring tape and measure your preferred size of the hat. After getting measurements, you can begin sizing your design. After sizing both your hat and design, you can now cut your design into your cutting machine.


STEP 2: CUTTING THE DESIGN.


Before you begin cutting, turn on the mirror option. This is usually necessary when working with a heat transfer material. When you mirror a picture, you're simply cutting it out backward.


Load the cutting mat into the cutting machine and press the start button to finish the cuts. Now, place the Heat Transfer Vinyl onto your cutting mat, face-down shiny part. This means that the carrier sheet is the shiny side and the matte part is the heat transfer substance.


Heat Transfer Vinyl On A Hat

 STEP 3: WEEDING THE DESIGN.

When you complete cutting, press the unload mat button. Start cutting off the excess vinyl around your design and weeding the unnecessary material using a weeding tool.


STEP 4: APPLYING YOUR DESIGN TO THE HAT.

First, heat your iron and set the proper temperature depending on what Heat Transfer Vinyl you are using. Most of the time, it is set at a high temperature. 

The tricky part is about to begin. Hats are tough to flatten, making it difficult to achieve the smooth surface required for HTV application. It's even more difficult if your hat has a center seam.

Simple Tips:

Don't worry because I have a trick for you! The hat's form can make this a little complicated. So, grab a towel or any fabric that is thick enough to be stuffed in the hat, and to help it stand firmly, we're going to fold this towel several times so we can load it neatly into the hat. This will help create a flat surface that will make pressing much more effortless.


Heat Transfer Vinyl On A Hat

The hat has a flexible surface, causing some unevenness, making it move little as you start pressing it. Add some towels or fabric to support it even more to resolve this.

Heat Transfer Vinyl

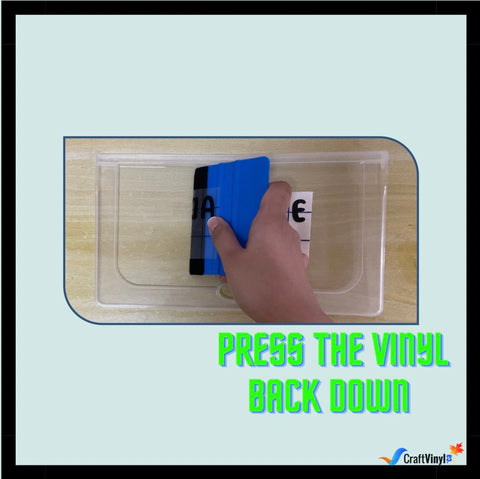
For about 10 seconds, preheat your hat before starting to press the design. After this, you can place the heat transfer decal in the chosen spot of the cap. You can also put a Teflon sheet above your design to reduce the temperature transferred to your heat transfer vinyl to your final substrate. Apply firm pressure for about 20 seconds with an iron depending on your chosen HTV. Curves may occur, so you'll have to press it carefully and press each section separately.


Before peeling up the transfer tape:

  1. Let it sit and cool for a little while.
  2. Apply even pressure, and do not move it around too much.
  3. Check to assess the progress of your project. You can go back over any areas where you believe the heat needs to be applied again.


Tips:

If you struggle to place your design into the hat, put some heat-resistant tape to hold your design onto it. Doing this will keep your design intact to your hat and make it easier to press.


If your design has layers, do the steps over again to your layers until you finish the layers of your design.


Heat Transfer Vinyl On A Hat


And that's it! We are all done with this project, and we hope you had a lot of fun doing this, just like we did while doing this craft! Make a few for yourself or give them as gifts — you could sell them! I hope you've been inspired to try something new and make your own DIY heat transfer vinyl hat. This may seem a little hard to do, but if you keep on practicing doing it and just enjoying crafting it, it will eventually turn into something good.


Thank you for sticking with us! We hope you learned something today, and if you try it, you can send your work and message us on our social media accounts. Don't forget to share this with your family and friends so they will also know the process of applying HTV on a hat. By checking out our website, you can also shop for your own adhesive vinyl. We offer different varieties, colors, and sizes of adhesive vinyl in very affordable prices!


If you are a crafting enthusiast, follow us on our social media accounts to see some tips and tricks for adhesive vinyl and heat transfer vinyl!


Social Media Accounts:

Facebook: CraftVinyl.ca

Instagram: @craftvinylca

TikTok: CraftVinyl.ca


Thank you, keep safe, and stay crafty, Crafters!

HTV APPLICATION WITH AN IRON

APPLICATION OF HEAT TRANSFER VINYL TO LEATHER

Continue reading

Adhesive Vinyl as Car Decals or Stickers

Adhesive Vinyl as Car Decals or Stickers

One of the many good things about adhesive vinyl is that you can apply it pretty much anywhere with a smooth surface, like wood, walls, glass, and even cars! Adhesive vinyl is perfect for this craft because it is designed to last outdoors. Customizing cars using adhesive vinyl is an excellent choice as it is durable, looks way better than paint, and can easily be changed when you want to upgrade and replace the design.

Continue reading

Heat Transfer Vinyl on Burlap How to Apply

Heat Transfer Vinyl on Burlap How to Apply
How to Apply Heat Transfer Vinyl on Burlap Burlap is a material that you often come across with especially when crafting. It is commonly used for household decorating. It is made from natural plant fibers, and has a rough or a coarse texture. Can you apply Heat Transfer Vinyl On Burlap? Continue reading

Heat Transfer Vinyl Tips and Tricks Part 1!

Heat Transfer Vinyl Tips and Tricks Part 1!

Hi there! In this article, we will be talking about more tips and tricks when crafting a new project using Heat Transfer Vinyl. This #Vinyl101 will help make your crafting experience less hassle and more fun!

Last time, we listed several #Vinyl101 to help you out when working with Adhesive Vinyl projects. This time, we will give out another ten tips and tricks when you work with Heat Transfer Vinyl projects.

Continue reading

The Hinge Method

The Hinge Method

The Hinge Method - Easy and Accurate Way of Application

A great way to apply your vinyl decals would be through the method commonly referred to as The Hinge Method. It allows smooth and accurate applications on the first try. Most importantly, we only need two materials: a ruler and painter’s tape!


To ensure the accuracy of the placement, we must use a ruler. The painter’s tape can then be applied later on. If you don’t have painter’s tape, you can substitute the material with paper tape. It is important to note that painter’s tape is much less sticky than paper tape, which can benefit our craft.


With that, we can begin performing the method itself.


The Hinge Method:

1. Prepare your design.

2. Cut and weed.

 When sending the vinyl to cut, it’s essential to use a square or rectangular shape. This way, we can use the ruler more accurately, as rounded edges can give you difficulty measuring the spaces. You also have to weed directly on top of the carrier sheet.

Hinge Method

3. Apply the transfer tape.

4. Cut off any excess transfer tape.

5. Place the design on top of the surface.

During this step, bring out your ruler and measure the spaces. This way, you’ll be able to decide on the final location of your design.

6. Apply the painter’s tape.

Grab some painter’s tape and place it in the middle of the decal. For the second time, bring your ruler out and measure if everything is still in the exact location you planned them to be.

Hinge method 

7. Peel off the transfer tape.

Pull from one of the sides and gently peel off the transfer tape, reaching the painter’s tape.

Hinge method 

8. Cut the carrier sheet.

 Don’t let the vinyl back down, as this may lead to the formation of bubbles.

 The hinge method

9. Using a squeegee, press the vinyl back down from the very center going outwards.

10. Remove the painter’s tape.

11. Repeat the same procedure.

Peel the carrier sheet off, and use the squeegee to press the vinyl back down. Run the squeegee for the second time before finally moving on to the next step.


12. Peel off the transfer tape.


Some people prefer putting the painter’s tape on top of the decal. There you can cut manageable sections, still creating a hinge-like structure. This method is versatile and can be done in large and small decals.


Use your squeegee to peel off the carrier sheet and do it downwards.


If you picked up a thing or two from this blog, please don’t hesitate to share it with your friends and relatives!


We’re interested in your vinyl crafts and would love to see them! You can send us a direct message on the accounts below so we can feature you on our page.


Facebook: craftvinyl.ca

Instagram: CraftVinyl.Ca

TikTok: CraftVinyl.Ca


You can also shop at our online store at www.craftvinyl.ca! We hope you stay safe. Happy crafting, Crafters!

ADHESIVE VINYL ON MUGS

THE KNOCK OUT METHOD

Continue reading

Adhesive Vinyl Tips and Tricks Part 2!

Adhesive Vinyl Tips and Tricks Part 2!

Hello Crafters! As promised, here's part 2 of Tips and Tricks when working with Adhesive vinyl! Remember, there are ways to ease your crafting experience, and this # Vinyl101 is the key or the solution for your little mishaps or problems!

In part 1 of this article, we tackled 10 Tips and Tricks that will help you when working with Adhesive vinyl! Now, we will be giving you another ten #Vinyl101! Let's get into it!

Continue reading

The Knockout Method

The Knockout Method
We can’t layer Glitter vinyl. However, with this simple trick, we can show the illusion that two Glitter Heat Transfer Vinyl are layered on top of each other. This method is the knockout method. Continue reading

Adhesive Vinyl Tips and Tricks Part 1!

Adhesive Vinyl  Tips and Tricks Part 1!

Hello there! Crafting with Adhesive vinyl is very exciting and fun. It can help increase happiness, reduce anxiety, and improve your mood. Some say that it’s better and a lot cheaper than therapy! But sometimes, it can be pretty stressful and intimidating even for those who aren’t beginners in this craft!

In this article, we will help you make your crafting experience a whole lot better! We will give you a list of #Vinyl101 tips and tricks that will help you whenever you work with adhesive vinyl!

Continue reading

HOW TO STORE ADHESIVE VINYL AND HTV

HOW TO STORE ADHESIVE VINYL AND HTV
If you have a cutting machine, you are most likely to have vinyl too, and we understand hoarding vinyl is entirely regular. But have you gotten to the point that you don't know how to store your vinyl? Do you feel like drowning in vinyl rolls? Are you having trouble finding your preferred vinyl for your project? Do you spend more time searching for your vinyl rolls and tools than crafting? It's time to organize your vinyl! Continue reading

Shirts for our son's 6th birthday!

Shirts for our son's 6th birthday!

It’s our son’s birthday today and every year I always want to make something special for his special day! For this year, I made our whole family, shirts! 


HTV Shirt


I love making things for them because I get to see their beautiful smiles every time they see my wonderful creations! You can really see the happiness and amazement in their eyes, and that makes my heart smile and flutter!

Materials used:

Continue reading